Monday, February 19, 2007
A $6000 Lesson (Part IV)
Wednesday, February 14, 2007
Tuesday, February 13, 2007
A $6000 Lesson (Part III)

 Prime the back of the canvas with gesso. Try your best to push the gesso all the way to the edges of the canvas even thought there isn't much room between the stretcher and the canvas back.
 Give it a second coat of primer if needed. In this case, only one coat was necissary. This canvas was preprimed, but you can add an extra coat to the front if you feel the need to do so.
Now, the canvas is ready to paint.
A $6000 Lesson (Part II)
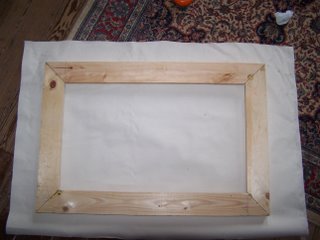
 The first step is cutting the canvas down to size. You want roughly 3 to 4 inches of canvas beyond the edge of the stretcher. Center the stretcher in the middle of the canvas.
 Start stapling. I usually start on the longest edges of the canvas (unless it is a square of course). Place one staple through the canvas in the center of the stretcher's edge. Stretch the canvas tight from the opposite side (grip edge of canvas with plyers and leverage with the back of the stretcher) and staple it in place. Staple the canvas into the back of the stretcher, not the edge. Repeat on the short edges. Then, working towards the corners from the middle staple, stretch and staple the canvas. Alternate between the short edges and long edges; try to reach the corners at the same time.
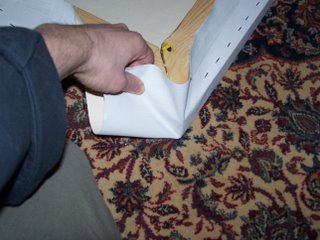
 When you reach the corner, fold one edge of canvas under the other and tuck it in place (see last photo in sequence). To make a neat corner, some trimming with the scissors may be necissary.


 Once you have a neat looking corner, staple it in place. Repeat for each corner. I try to make the corner seam (see picture above) face down or up depending on whether it will be the top or bottom edge of the painting. Then, if it is hung without a frame, it ought to be invisible.
Sorry, this picture ought to have been earlier in the sequence. This is me tucking one edge under the other.


